Search
Electrical
Wiring Doorbell Transformers
 Wiring doorbell transformers is not too difficult. Make sure the Power is OFF! before you work on it.
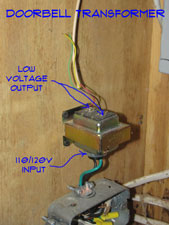
Doorbell transformers need to provide the required voltage for the unit in question.The transformer reduces the 120 volt power in your home to the desired voltage for your doorbell. This is usually between 12 and 24 volts.
For related information, see the articles 'How To Fix a Wired Doorbell' ,'Wired Doorbell Buttons' and 'Wired Doorbell Installation'.
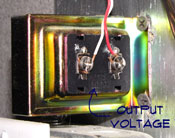
You will need to use a multi meter to tell if the transformer is working properly. Measure the voltage between the two terminals on the transformer.
Multi meters are a little tricky to use, take a look at, Using a Multimeter, for more information.
Does it match the secondary voltage that is needed. If not, you will need to replace the transformer. The 'secondary' or 'output' voltage should be marked on the transformer. It will be on an namplate, possibly embossed on the plastic shield where the low voltage wires are connected.
For the transformer listed in the picture the voltage should read 16 volts.
They are about ten to fifteen dollars. You can get them one from a home supply store. Obtain a new one with the same ratings as the one you have.
 Turn off the power and hook up the wiring the same as the old on. Use a voltage tester to make sure the power is off. One side of the transformer has the 120 volt wiring attached to it. This is the side that will shock you if the power is not off. Tag the wires if you need to.
The low voltage side will have two small wires attached to it. The polarity for these two wires does not matter. Remove both sets of wires from the transformer.
After you have removed the wires you can unscrew the transformer and install the new transformer and hook up the wires. The 120 volt wires go to the 'Line' side of the transformer and the low voltage wires connect to the 'Load' side.
Fixing Transformers
Doorbell transformers need to provide voltage for the doorbell unit in question. You will need to use a multi meter to tell if the transformer is working properly.
There is not much you can fix on a doorbell transformer that is not converting the power correctly.
When this happens you will need to replace the transformer. They are about ten dollars. Obtain a new one with the same ratings as the one you have.
Turn off the power and hook up the wiring the same as the old one. Tag the wires if you need to.
For related information, see the articles 'How To Fix a Wired Doorbell' ,'Wired Doorbell Buttons' and 'Wired Doorbell Installation'.
Wired Doorbell Chimes
 Wired doorbell chimes are the part that makes the bell or chimes ring. There are a lot of different doorbell manufacturers with a lot of different models. The chime units themselves are architectural units and may be quite costly. So fixing them can be worth the effort
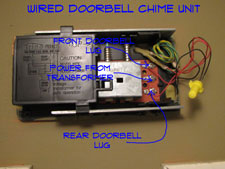
You have a low voltage wire coming in from the transformer and additional wires coming in from one two or more doorbell buttons. The wired doorbell chimes ring differently for the different doors. One key thing is to check the connections for the low voltage doorbell wiring. An obvious loose or corroded wire should be fixed. The other big question would be, whether or not you are getting power from the transformer.
You can use voltage meter to check and see if you have power first to the chime unit from the transformer and then AC power to the transformer. Carefully use the leads on a multi meter or a voltage sensor to see if you have power. A low voltage sensor should be used at the chime unit and the outbound side of the transformer. A 120V AC sensor can be used at the inbound side of the transformer. Repair faulty wiring when you find it. Remember to turn the power off before messing with the wires.
Side Note: A note about testing circuitry. Meters and testers are other tools that you may need from time to time. For as little as twenty or thirty dollars you can arm yourself with a couple of voltage testers and a multi meter. I would suggest a standard voltage tester, a low voltage tester (non-contact testers are the best) and an inexpensive multi meter. Multi meters are a little tricky to use, try these resources for additional information, Using a Multimeter, for more information. With this testing equipment you will be able to trace down what is happening with electrical items in your home.
If you find that you have proper current and the buttons are in good order, then it is the chime unit. Time to go to the home improvement store and find another one. Pick out one you like and can afford. Follow the installation instructions. Presto, you now have a new doorbell and completed your doorbell wiring repair.
WARNING!! Make Sure the Power is OFF!!! BEFORE You Work on Electrical Devices!!!
Fixing Wired Doorbell Chimes
We are headed into uncharted waters here. Not really, but there are a lot of different doorbell manufacturers with a lot of different models. The chime units themselves are architectural units and my be quite costly. Simply put, you have a low voltage wire coming in from the transformer and additional wires coming in from one two or more doorbell buttons. The chimes ring differently for the different doors. One key thing is to check the connections for the low voltage wiring. An obvious loose or corroded wire should be fixed. The other big question would be, whether or not you are getting power from the transformer.
You can use voltage meter to check and see if you have power first to the chime unit from the transformer and then AC power to the transformer. Carefully use the leads on a multi meter or a voltage sensor to see if you have power. A low voltage sensor should be used at the chime unit and the outbound side of the transformer. A 120V AC sensor can be used at the inbound side of the transformer. Repair faulty wiring when you find it. Remember to turn the power off before messing with the wires.
Side Note: A note about testing circuitry. Meters and tester are other tools that you may need from time to time. For as little as twenty or thirty dollars you can arm yourself with a couple of voltage testers and a multi meter. I would suggest a standard voltage tester, a low voltage tester (non-contact testers are the best) and an inexpensive multi meter. Multi meters are a little tricky to use, try these resources for additional information, Using a Multimeter, for more information. With this testing equipment you will be able to trace down what is happening with electrical items in your home.
You can use voltage meter to check and see if you have power first to the chime unit from the transformer and then AC power to the transformer. Carefully use the leads on a multi meter or a voltage sensor to see if you have power. A low voltage sensor should be used at the chime unit and the outbound side of the transformer. A 120V AC sensor can be used at the inbound side of the transformer. Repair faulty wiring when you find it. Remember to turn the power off before messing with the wires.
If you find that you have proper current and the buttons are in good order, then it is the chime unit. Time to go to the home improvement store and find another one. Pick out one you like and can afford. Follow the installation instructions. Presto, you now have a new doorbell and completed your doorbell repair.
Wired Doorbell Buttons
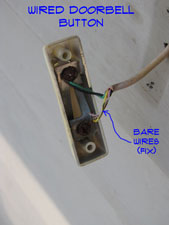 To repair wired doorbell buttons, remove the two screws on you doorbell button. There should be two wires attached to the back.
If you don't see wires, you have a wireless unit. See the article 'Wireless Doorbell Repair' for more information. Faulty wires or the button itself are the culprit most of the time. For related wired doorbell articles, see the article 'Fixing Wired Doorbells'.
Checking the Doorbell Wires
Are the wires loose or corroded? Yes, then turn off the power and clean them up or tighten them. Does the doorbell work now? Yes, great, your done fixing your wired doorbell button.
No, shut the power off and then unhook them from the button and see if the doorbell sounds when you touch the two wires together. Turn the power back on to do this. Does it work? Yes, then the button is bad and needs to be replaced. Obtain a new wired doorbell button and attach the two wires to it and screw it back onto the door jamb. Still not that hard, right?
Sticking Doorbell Buttons
Another issue with a wired doorbell button would be a doorbell that rings constantly. A sticking doorbell button is usually to blame. The button itself might need to be replaced. Turn the power off and unhook one of the wires from the button. Turn the power back on and see if it stops the ringing.
Yes, then it is the button. Get a new one and replace it. No, then it is a short in the wiring. Check the wires for cracks or missing insulation. Repair as needed.
Repairing Doorbell Buttons
Fixing a wired doorbell button will likely involve corroded and broken wires. On occasion the switch inside the doorbell button goes bad.
The first thing to do is remove the two screws on you wired doorbell button. There should be two wires attached to the back. Faulty wires or the button itself are the culprit most of the time. Are the wires loose or corroded? Yes, then turn off the power and clean them up or tighten them. Does the doorbell work now? Yes, great, your done with your doorbell repair.
If you don't see wires, you have a wireless doorbell unit. The article 'Fixing Wireless Doorbell Buttons' will give you some instructions on this issue.
No, shut the power off and then unhook them from the button and see if the doorbell sounds when you touch the two wires together. Turn the power back on to do this. Does it work? Yes, then the button is bad and needs to be replaced. Obtain a new wired doorbell button and attach the two wires to it and screw it back onto the door jamb. Still not that hard, right?
If this does not work then it is a short in the wiring. Check the wires for cracks or missing insulation. Repair the wires as needed. This will only work if the wires are visible. For broken or corroded wires that are hidden you will have to make a choice. Trying to fix or replace the wiring may be too big of a job to tackle. See the series of articles on 'Doorbell Wiring' for more information.
The other choice would be to replace the doorbell with a wireless doorbell. See the articles on 'Replacing Wireless Doorbells' for guidance.
Doorbell Wiring
 Wired Doorbells will, obviously, have doorbell wiring. All the components are connected by Wires. This type of system has a transformer that reduces the voltage down to something that the doorbell can handle
Not sure if this is your problem? See the articles 'Troubleshooting Doorbells', 'Repairing Wired Doorbells' and 'Fixing Wireless Doorbells' for listings on all the doorbell topics.
Doorbells have been around ever since 1831. In the early nineteen hundreds they became practical and common. Chimes and bells are a newer development, it used to be a buzzer, are you old enough to remember?. Today, we consider doorbells to be standard item in a home. Knocking is still an option, it's just that not everyone thinks to do it.
Most doorbells fall into two categories. Wired units consisting of a transformer, chime unit and the doorbells themselves. The other style is the wireless units that do not require internal hard wiring to operate. In this article we are focusing on wired units. See the article 'Doorbell Repair', for information on other types of doorbells.
Repairing Doorbell Wiring Using Common Sense
What Can You Save? - Assuming you had a simple problem it could run between $50 and $75 for an electrician to make a repair on your doorbell. You could be sold on a new system which might run $100 to $175 installed, even more for a high end system. Repairing it yourself might be as simple as tightening a loose wire. So your savings could be from $50 to $175.
How Hard Could It Be? - Doorbell wiring is fairly simple. Worst case scenario, replacing the entire system is not that hard. These repairs will have a Difficulty Level of: A Bit of Work. These repairs require a Skill Level of: Handyman. For and explanation of the terms in this section, see 'How to Use This Site'.
What Can Go Wrong? - Most of the components on a doorbell system are low voltage, therefore not dangerous. The exception is the transformer for a wired unit. Electrical shock rules apply, take precautions and shut the power off when working around the transformer. Yes serious injury and death are possible. Ruining a working unit trying to repair it is also possible. You can buy a whole new system for between $25 and $75, not the end of the world.
Troubleshooting Doorbell Wiring
The button is the culprit a lot of the time. See Step One for what to do. It is also the easiest thing. Next comes the chime unit. See Step Two for guidelines. Step Three talks about the transformer and what to do if it is bad.
The 'Wired Doorbell Buttons' are the first place to look when you start having trouble with your doorbell. This article provided tips on what to do.
The chime unit makes the doorbell sound that alerts you when the button is pushed. 'Wired Doorbell Chimes' can be fixed, but they require some special testers to check them.
The 'Doorbell Transformer' provides the power, reducing it from household current. These can be replaced for a reasonable sum.
Summary
A malfunctioning doorbell is not the end of the world. People got along for thousands of years just knocking. It is irritating when you don't know someone has visited because you didn't know the doorbell was not working.
Even if your doorbell repair involved replacing your equipment, it should not have been that hard. Now that you are done with your doorbell wiring you can decide what you want to do with all of your free time. Got more jobs on your list? Relaxing would be another viable option.
Ceiling Fan Pull Chains
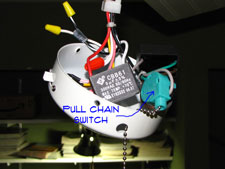 Most fans have a pull chain to control the fan and one to control the light.
Do you have a different problem? See 'Electrical Repair' for a complete listing of all electrical topics.
You may have individual switches for your fan and light and have a speed control at the switch. Good for you. Many fans are controlled with pull chains. Three speeds for the fan and one click to turn the light on and off.
The pull chain switches can go bad or freeze up. Is the fan stuck on one speed? As a rule they are wired permanently into the fan.
They can be replaced by splicing the wires inside the housing. Obtain a new switch and loosen the retaining nut. Make sure the power is off and cut the wires to the switch.
Splice the wires together with wire nuts and put the switch back into the housing. Turn the power back on and give it a try. The fan or light works, great you are done with your ceiling fan troubleshooting.