Search
Electrical
Installing a Wired Doorbell Chime Unit
You will need to select a location for your chime unit. There are two factors to consider. (1) The unit needs to be in a location where it will be heard. (2) It will also need to be a location that wiring can be run to it, or, already has wiring installed.
The wired doorbell that you buy will come with a set of installation instructions. Choke back the desire to proceed without reading them. There will be some key points that you want to take note of.
The first step or an early step will likely be mounting the chime unit. Generally you mount them high on the wall in a location where it can be heard. Being able to hear your doorbell is important for obvious reasons. Putting in an obscure location where you won't be able to hear it is not wise.
The instructions will likely have some guidelines on how to place it in relation to the buttons. Decide on a location and then you are ready to install it.
Wired doorbells do not weigh very much so, in wall backing is usually not required. Some type of plastic shield will likely be provided with the doorbell. You should get a template for the hole pattern with the unit, but not always. You may have to measure the mounting holes on the base plate. Use a level when you lay out the holes
With the holes laid out you can use a drill to put the anchors in. Once you have the anchors installed, you can set the base plate. Mount the base plate as directed. This is the hardest part, once it is done you can relax.
Instructions may vary, but you will likely want to make sure you have the batteries in at this point. You will not be able to test the wireless doorbell without the batteries.
Installing and Replacing Doorbell Wiring
Installing doorbell wiring involves running wiring from the doorbell transformer to the chime unit and then to each doorbell. This usually means one pair of wires to each location.
Obviously, this is a big job in an existing home. It will often mean fishing wires which is not impossible, but difficult.
You might want to consider a wireless doorbell unit at this point. See the article, 'Wireless Doorbell Installation' for more information.
Doorbell wire is usually #20 awg and would be two conductors. You may find it in different colors, sometimes 'red' and 'white', other times different colors where both conductors are the same.
The color of the conductors for a doorbell is usually not important. Either conductor can be hooked to either terminal at each connection point. You will want to check the instructions that came with your kit to make sure you are getting the right wire.
Assuming you have a path to route the wire through an attic or basement, this will not be too difficult. Secure the wire with small cable staples and leave enough extra at each termination.
Installing a Doorbell Transformer
Installing a doorbell transformer requires two basic steps. Finding a location and then setting the transformer. The second step is hooking up the wiring. Most of the time, you are going to replace a transformer that is already in place. This is the easiest installation.
Not sure if you need to replace the doorbell transformer? See the articles, 'How To Fix a Doorbell' and 'Troubleshooting Wired Doorbells' for more information.
Locating the Transformer
A doorbell transformer has to have a supply of the 110/115 volt power from your homes electrical power supply. It needs to be in a location where wiring can be run to it. Near the main panel, subpanel or junction box would be a likely choice. You will need to consult local building codes and have an understanding of how to add electrical wiring if this is a totally new installation.
The articles 'Basic House Wiring' and 'Electrical Safety Tips' can provide some useful information. Never work on wiring with the power on. Always double check with a tester before you disturb or alter any wiring. Consulting an electrician would be a wise choice if you are unfamiliar with electrical wiring.
The decision is much simpler if you already had a transformer and you are just replacing it. You can install the new transformer in the same location as the old one. Make sure the Power is Off!! before you remove the old transformer. Unhook the wires on either side of the transformer. You will have the two power wires (and possibly a ground), on one side. On the other side you will have two low voltage wires.
Hooking Up the Wires
With the transformer in place you can hook up the wires. First hook up the power supply wires and the ground wire if a lug is provided. Check the instructions that came with your doorbell kit to verify that you are using the right terminals. After the power supply is hooked up, you can install the low voltage wires. Generally, it does not matter which wire is hooked to which terminal. If the neutral and hot are indicated and the doorbell wire is color coded, such as 'red' and 'white'. You can hook the white wire to the neutral and the 'red' or colored wire to the hot lug.
Many times you will find that the doorbell wire is not color coded and the terminals are not marked. Check the instructions to make sure that wires can be generically installed. Hook one wire to each terminal or as indicated in the instructions.
Leave the power to the transformer turned off until the rest of the doorbell wiring is done.
Summary
The transformer is a simple device. All it does is reduce the regular household current down to a voltage that the door bell can use. If you already have one, replacing them is not that hard.
Wired Doorbell Installation
A wired doorbell installation involves more work than installing a wireless doorbell. A wired doorbell has one more component than a wireless unit. This is the transformer. The big difference will be the wiring. If your wiring is still intact, and all you are doing is changing the components, then the job is not so difficult.
Not sure if you need to replace your doorbell? See the article on 'Fixing and Troubleshooting Doorbells' or 'Repairing Wired Doorbells' for listings of all the doorbell topics.
Selecting a new doorbell will probably be the biggest job. There are options and choices that need to be made. How many doors do you have that need a doorbell? The number of buttons that the doorbell supports can vary. Two buttons are common, but more are available.
There is also the appearance and finish. You can get units that have cases with nice finishes and decorative chimes. The nicer ones will obviously cost more.
It is an easy job and should not take very long.
Wired Doorbell Installation - Information
What Can You Save?
If you decide to hire someone to install your doorbell system, it could run you $100 to $175, even more for a high end system. You will still have to purchase the unit so your savings would be the labor to install it, around $50 to $75.
How Hard Could It Be?
Installing a wired doorbell can involve some work, especially if new wiring is needed. It also involves working with electricity. Caution is needed.
Check the Simple Things
Loose or broken wires at the buttons or chime unit can cause the doorbell to not work. Check the connections before you give up on your doorbell.
What Can Go Wrong?
Wired doorbells as the name implies, involve wiring. Running wiring inside of an existing home is a little difficult, unless you have access to the areas needed. Another caution is that wired doorbells are hooked to your home's power supply. Electrical shocks are possible and dangerous. Never work on wiring unless the power is off.
Wired Doorbell Installation – The Steps Involved
For some tips on how to purchase a wired doorbell, see the section below on 'purchasing doorbells'. Some useful tips are provided for when you go shopping.
The power for a wired doorbell is provided by the transformer. The article on 'Installing a Doorbell Transformer' gives you instructions on how to set and wire the transformer.
Wiring is the key feature for this type of doorbell. Running new wire through an existing home is a big job. Usually, the wiring is already in place. The article 'Installing Doorbell Wiring' provides information on adding or modifying wire if needed.
'Setting the Doorbell Chime Unit' discusses where to locate the chime unit based on a few key factors.
The article 'Installing Wired Doorbell Buttons' provides information on wiring and installing the buttons and how to coordinate them with the chimes.
Purchasing a Wired Doorbell Unit
There are a lot of options for purchasing a wired doorbell. Home supply stores will have a few to choose from. The internet will have a lot of options. Deciding what you want is always the first battle in making a purchase like this. Once you are past that, the installation will seem easy.
You can buy a basic wired doorbell kit that includes everything you need for one or two doorbell buttons for as little as $20 or $25. It may not be the most attractive thing you have ever seen, but it will be functional
In the $25 to $100 range you can find a wide variety of doorbell kits that will likely suit your needs. Multiple doorbell buttons and multiple types of chimes are supported. Some will even have metal chimes that hang down for a more elegant look. Some units even have the option of enabling a wireless feature for the doorbell buttons. This could be quite handy when adding doorbell buttons.
Appearance is always a consideration. This is especially true when the chime unit is in an area where it can be seen. Seeing the actual unit on the wall in a store would be preferred. When shopping on the internet, try to find as many pictures as possible. Remember, pictures on the internet are 'low' resolution and do not always accurately reflect appearance. Finding .pdf pictures on a manufacturer's website may help.
Another issue is the chimes. Some units have several options for the 'chimes' or 'tones' that the doorbell generates when the button is pushed. They are set up so that the sounds are different for each door. Read the information about the 'chiming sounds' if you have a preference for this feature.
Purchasing a Wired Doorbell - Checklist
- Does the doorbell have support for the number of doorbell buttons you need?
- Are all the buttons you need provided with the kit?
- Does the unit provide a variety of chimes that you can choose from? If not, will you like the ones provided?
- Does it match your decor?
- Are replacement parts available?
With all of these options, it may take you a little while to decide. Once you have decided you can get ready to install your new doorbell. The next article gets you started.
Summary
Once you have selected a new doorbell, replacing the components for a wired doorbell is not too hard. Replacing wiring if any is damaged or missing takes some extra work.
Fixing Phone Jack Wiring
 Why would you need to do any phone jack wiring? I can remember a few years ago calling a new phone order in to the phone company. The customer service person, explained to me the various charges. Then she outlined the extra charges for anything that would need to be done inside the home beyond the junction box. All I can remember was the $45 for the first fifteen minutes and $25 for each fifteen minute period after that.
I had already pre-wired the house, but that certainly scared me. I went back and checked all the wiring to make sure I did not need anything done inside the house. How hard could it be to warrant $120 per hour, and that was several years ago.
Phone jack wiring is not that difficult. The only complexity is that we now have more options. Wireless phones, internet phones and of course the old stand by, wired phone jacks. Check out the information below to see if you are up to this type of repair. Look at the evaluation section first to determine if it is worth it.
Fixing Phone Jack Wiring - Information
What Can You Save?
Did you call the phone company? You could save a lot. Assuming you called someone that had rates that would be somewhere on this planet, you could be looking at $50 to $75 for someone to come out. Could be more, fishing new wires for phones into an existing home can be time consuming.
How Hard Could It Be?
Phone jack wiring is not that hard. The difficulty comes with getting the wires to where you want them. We are excluding installing new phone wires in your home, for this article.
Check the Simple Things!
Loose wires are the obvious simple solution. Check the connections. Does something change when you jiggle the wire? Yes, it could be that simple. Connections are very sensitive. Make sure you are getting a good connection at all critical locations before you mess with anything else.
What Can Go Wrong?
Well, being without a phone is a definite problem. This is low voltage wiring so there is not a lot of danger.
Types of Phone Wiring
The older your home the better chance you have of finding different types of phone wiring. For home built in the last ten years the wiring is supposed to meet Cat 3 Standards. Cat 5 wire now being the preferred wire. The advantage to this type of wire is that it eliminates 'cross talking' (hearing another conversation over your line) and interference from radio frequencies.
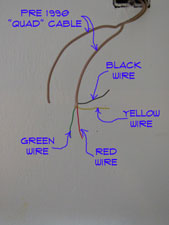
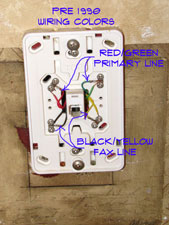
Homes that are older than that might have the 'quad' wiring that was used for several decades. This wire had four conductors, not twisted as the new standard requires, they were red, green, yellow and black. Phone jacks and other phone devices that you purchased would be color coded to match this wire. The red and green wires would be the primary line and a second line could be hooked to the yellow and black wires.
 In theory this would work fine. The problem is that they are not twisted pairs and are susceptible to the 'cross talking' and interference previously mentioned. This type of wire may be fine for a single line or could even accommodate a fax line. You may get the fax noise bleeding into the voice line if you use it this way.
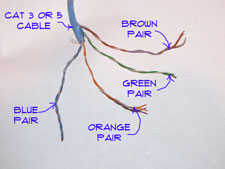
If you are planning on a home office or multiple hard wired lines for whatever reason, you will want to upgrade the wiring. Cat 5 Wire comes with four twisted pairs. The colors are Blue/White with Blue stripe (Primary Line); Orange/White with Orange stripe (Second Line); Green/White with Green stripe (Third Line); Brown/White with Brown stripe (Fourth Line). That is how the colors are supposed to be used. That does not always mean that they were used that way in your home.
Twisted pair wires should not be mixed with each other. Back to that whole 'cross talk' thing. Instead always use the pairs together as they come in the cable. One pair, one line, simple, right?
You may run into other types of wire in older homes. When possible you may want to replace older or non standard types of wire. The newer wire is designed for communications and does a much better job.
Types of Telephone Service
There are different types of telephone service that you may encounter in your home. The type of service affects the wiring that you will have.
Analog - Standard land lines or analog lines are the kind we had for decades. The phone company brings one or more lines into your home via a terminal block. This block is usually located on the outside of your home.
Your internal phone wires are hooked to it and the phones work. This type of wiring has its own power in it. That is how you are able to hear the dial tone. Most new phones with features require more power and have 120 volt adapters attached to them.
DSL - Stands for Digital Subscriber Line. Without getting into tech talk this technology gives you high speed internet over a standard analog phone line. How fast and in which direction it is provided will be determined by the service your phone company provides. In practice, you often get a voice line and a DSL line in one package.
DSL lines are hard wired into your home and use wired jacks similar to the hook up the phones. There is usually a splitter that allows you to separate the phone line from the digital service for the computer.
Wireless - You are still able to have wireless phones in your home if you purchase a set up that uses a base unit. The base unit is hooked to the hard wired phone line and transmits to the other wireless phones. This allows you to put phones anywhere in the home. You can purchase a pretty decent system with three or four phones for less than a hundred dollars.
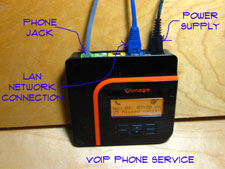
VoIP - Stands for Voice over Internet Protocol. This allows you to have a telephone that works via a high speed internet connection, usually a cable modem. The advantage to these systems is a lower cost. An adapter is hooked up the modem and usually provides a phone jack. You will need to disconnect the phone company's wiring from any line that is being hooked to the hard wiring in your home. You can burn up the adapter if you do not.
The intricacies of mixing a VoIP system with various other types of phones in your home is beyond the scope of this article. You may get a self explanatory kit from your provider that tells you exactly how to hook it up. Follow the instructions carefully, call the tech line if needed. Take a look at this webpage for some additional information, How to Distribute VoIP Throughout a Home. This website provides a pretty in depth discussion on what to do for this type of system.
Cell Phones - Many people have scrapped the idea of having a home phone number altogether. They just use their cell phones for all of their calling needs. Nothing wrong with this, just remember to plug it in. You don't need any phone jack wiring at all for a cell phone connection.
The older your home the better chance you have of finding different types of phone wiring. For home built in the last ten years the wiring is supposed to meet Cat 3 Standards. Cat 5 wire now being the preferred wire. The advantage to this type of wire is that it eliminates 'cross talking' (hearing another conversation over your line) and interference from radio frequencies.
Homes that are older than that might have the 'quad' wiring that was used for several decades. This wire had four conductors, not twisted as the new standard requires, they were red, green, yellow and black. Phone jacks and other phone devices that you purchased would be color coded to match this wire. The red and green wires would be the primary line and a second line could be hooked to the yellow and black wires.
In theory this would work fine. The problem is that they are not twisted pairs and are susceptible to the 'cross talking' and interference previously mentioned. This type of wire may be fine for a single line or could even accommodate a fax line. You may get the fax noise bleeding into the voice line if you use it this way.
If you are planning on a home office or multiple hard wired lines for whatever reason, you will want to upgrade the wiring. Cat 5 Wire comes with four twisted pairs. The colors are Blue/White with Blue stripe (Primary Line); Orange/White with Orange stripe (Second Line); Green/White with Green stripe (Third Line); Brown/White with Brown stripe (Fourth Line). That is how the colors are supposed to be used. That does not always mean that they were used that way in your home.
Twisted pair wires should not be mixed with each other. Back to that whole 'cross talk' thing. Instead always use the pairs together as they come in the cable. One pair, one line, simple, right?
You may run into other types of wire in older homes. When possible you may want to replace older or non standard types of wire. The newer wire is designed for communications and does a much better job.
Wiring a Telephone Jack
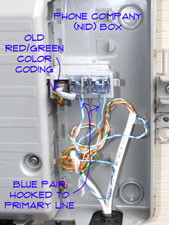 The whole concept of phone jack wiring is pretty simple if you stay with the pairs. How many lines do you have coming into your home? For each line you should have a pair of wires that is coming out of your terminal box or Network Interface Device (NID) in phone company speak.
Often the phone company will mark the lines with the number that is associated to them. This would normally be true where you have multiple lines. With only one line it should be a no brainer.
 The first thing you want to do is determine which pairs are associated with which lines in your home. The phone company will likely use the normal hook ups. Using red/green; or blue/white for the primary line. Write down which pairs go to which lines.
Most over the counter phone jacks and devices will still use the red/green colors for the primary line. So if you are hooking up a fax line to a jack you will attach the orange/white pair to the red/green terminals on the jack. Is the jack for the regular phone line? You would hook the red/green or blue/white wires to the red/green terminals. Simple? So is rocket science to an MIT graduate.
Just keep the pairs together, don't mix them up. If you get them backwards you can usually tell. Try the primary line, does the fax machine screech in your ear? Does your daughter answer on her line? You have something reversed. Switch the wires and try again. Test all the lines before you get everything put back together.
Are all the phone jacks working now? Good, this phone jack wiring project is history.
Troubleshooting Phone Jack Problems
 Troubleshooting phone jacks will often involve loose or broken wires. Assuming your phone service is working at other jacks in the home you would want to check the connections. You saw how thin that wire is, yes it can break.
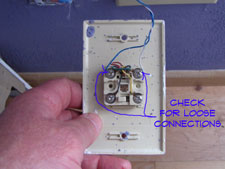
Take the cover plate off and check the wires. Are they loose? Do they appear to be broken? Try redoing the connections, possibly cutting a little off of the wire and stripping them again. A break is likely to occur right at the connection lug. Hook them back up and see if the phone jack works.
Phone jack wiring will usually be connected together on the back of each jack. Check other nearby jacks to see if there are any loose or broken wires that could be feeding the problem jack. Unless you have been doing some remodeling, it is unlikely that the wire in the wall had gotten damaged. Not impossible, just unlikely.
Are all your jacks working now? Great, you have successfully dealt with some phone jack wiring issues. How to you feel? I thought so, proud.
Summary
As technology continues to advance there will no doubt be more and more ways that phones can be hooked up. Today there are still a lot of phones that are hooked to hard wires. It is low voltage wire and can break.
Remember that each phone line needs a pair of wires to work. Keep the pairs together. Locate the right pair for the phone jack you are working on, two minutes with a screwdriver and presto, a working phone line. Phone jack wiring can be that simple.