Search
Electrical
Dimmer Switch Wiring Diagram
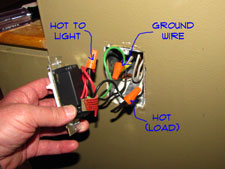
 Locating dimmer switch wires is important. Many dimmers need to be loaded a certain way to work properly. Check the wiring diagram for the dimmer that you have purchased. Do you know which wire is the load (Hot)? You don't, great, what do we do now?
Not a big deal use a voltage tester to check which wire is hot. A non contact tester is best. You will have to turn the power back on. Make sure the wire nuts are on the exposed ends of the wires. Got it now? Put a piece of tape on it to tag it for now.
Make sure the switch is in the off position. One wire leading to the switch should be hot with the switch off. The other wire should not have any power. Are both of them hot? Then the switch is not off. Tag the hot wire before you remove the wires. Turn the breaker back off, remember.
One issue with dimmer switches is that they are bigger than normal switches. You may need to push the wires back into the box a little tighter to make room. Did you think that wiring a dimmer switch would not be any work at all?
How To Replace a Dimmer Switch
 Is wiring a dimmer switch something you can do? Maybe the switch is old and worn out looking. In the evening the light is too bright, why not replace it with a dimmer switch? Rarely, a switch may go bad, and need to be replaced. Light switches are the easiest of all items to wire. Only one wire is involved, unless it has a grounding lug and then you have two. The Hot (Black) and the Ground (Bare or Green).
For related information see the articles 'Wiring a Three Way Switch', 'How To Wire a Light Switch' and 'Troubleshooting Wiring Problems'.
Obtain your desired dimmer switch before you begin. This is where you will have a problem. I must warn you that there are a lot of choices for dimmer switches. You may need to involve your spouse in this decision. I know, it's a hassle, but it takes less time than going back a second time with both of you.
Find a dimmer switch that suits you and you're ready to go. They can vary quite a bit in cost. You are mostly paying for the look on the expensive ones.
Wiring a Dimmer Switch - Information
What Can You Save?
Prices will vary but it will probably cost between $40 and $150 to have someone come out and replace a light switch for you. New dimmer switches can run anywhere from $5 to, well, a lot more. Your savings could be between $35 and $145, not bad for fifteen minutes of work wiring a dimmer switch.
How Hard Could It Be?
Wiring a dimmer switch is not that difficult.
Check the Simple Things!
We have covered this topic for completeness. If you dimmer switch is toast, then replacing it is about your only option. Are you just upgrading, then you still need to replace the old switch.
What Can Go Wrong?
Electrical shocks can cause severe injury and even death. Be careful, make sure the power is off. Always double check, turn the breaker off and then use a tester to make sure nothing is hot. It is possible for more than one circuit to be fed through a single box. Faulty or incorrect wiring can cause dead shorts and fires. Make sure you understand how to hook something up before you attempt it.
Troubleshooting Dimmer Switch Wiring
Dimmer switches are wired the same way as regular switches. If you are having trouble with a switch you want to see the article 'Wiring a Light Switch', for some troubleshooting tips.
Locating Dimmer Switch Problems - The first thing you will need to do is determine what is wrong with the dimmer switch. Is it the switch that is bad? This article will help you track down the problem and locate the correct solution.
How Does a Dimmer Switch Work - It is helpful to know how dimmer switches work. This will help you to determine whether the symptoms or problems your are experiencing are related to the actual switch.
Types of Dimmer Switches - If you need to replace your dimmer switch, you may be suprised at the variety of options theres are for replacements. What type of dimmer switch will match the wiring you have in your home? Consult this article before you replace your existing dimmer Switch.
Removing a Dimmer Switch – This step discusses taking out the old switch before you install the new one.
Dimmer Switch Wiring Diagrams – Finding the right wires with a standard two pole switch is fairly simple. Find out how and what to do if it is not a two pole switch.
WARNING!! Make Sure the Power is OFF!!! BEFORE You Work on Electrical Devices!!!
Installing a Dimmer Switch
 With the proper wires located, you can begin installing a dimmer switch. Take note of the orientation of the switch wires. It is likely that the dimmer switch that you purchased needs to be turned a certain way. Check the instructions. I know you hate to do that, but go ahead, wait until no one is looking. Turn the switch the right way.
Bend a hook in the wires or strip them the proper distance if the switch has hold down plates on the lugs. The ground wire is always wrapped around the green screw. Check the installation instructions for the switch you purchased to be sure.
Hook the wires up to the lugs on the switch. Turn the power back on to make sure it is working properly. Does the light work? Yes, great! You're almost done wiring a light switch. Turn the power back off and wrap some electrical tape around the lugs. Screw the switch back into the box and install the cover plate. That's all there is, congratulations!
How To Balance a Ceiling Fan
 Turn the breaker back on and see if everything is working. Are the blades turning? At this point the fan should be moving air.
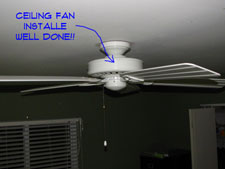
Is it turning smoothly and evenly? Is it quiet? Assuming that you installed all of the mounting hardware correctly, the fan should operate smoothly with no extra work.
Once in a while, something will be slightly out of kilter and the fan will wobble. This can be distracting and cause parts to loosen over time.
Final adjustments may be needed if the fan is not turning evenly. You should have got a weight kit with the fan.
Follow the instructions provided with the fan to balance the blades. It is a bit of trial and error, but worth the effort.
Keep playing with it until it turns evenly. Running smooth now? Great, you are done wiring a ceiling fan. New horizons of home repair await you.
Ceiling Fan Wiring Diagram
 Hooking up fan wires will vary depending on the wiring you have. To use a switch for both the light and the fan you will need wiring that has an extra wire in it. This would be 14-3 or 12-3 Wire.
Power from the box would be attached to each switch and then the black and red wires would be attached to the other side of each switch. This gives you the ability operate the light and fan separately.
For a fan that was not wired this way originally you may be stuck using the pull chains to control the lights and fan. You will still need to use the pull chain to change the speed on the fan no matter what you do.
Installing new wire for wiring a ceiling fan is a difficult problematic project. You would have to run a three conductor cable from the switch to the fan. This may be possible if you have an attic above the fan. You would still need to fish the wire down through the wall into the switch. This article is not intended to address this type of upgrade.
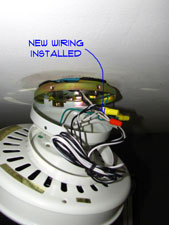
The course of wisdom would be to just use a pull chain. Not that hard really. Do you have the red and black conductors? Yes, follow the wiring diagram for the fan and hook one lead to each conductor. Hook up the white wire and ground wire as indicated. Tuck the wires up into the box and you are done wiring a ceiling fan. Well your not really done, but the wires are hooked up.
Only one conductor? You will hook both leads up to the single conductor. Again follow the wiring diagram provided. The black wire will provide power to both the light and the fan and you will use the pull chains to adjust.
Mount the motor unit to the base plate, following the instructions provided. Install the blades and lights as indicated. Some fans will have an additional electrical connection to make for the lights. Sometimes it is just a plug in. Use the instructions and the wiring diagram to complete. Add light bulbs and presto, you should have a working ceiling fan.